Dependence on a shared gem: one of the downsides of a multi-app architecture.
18 months ago, we wanted to improve our site’s stability and scalability, so we re-architected a monolithic Rails app into two separate Rails apps that communicated through a shared database.
One app was a CMS for our Editorial team, and the other was our WWW app presenting content to our readers. These apps used a gem to share code for the models they both depended on (things like a story model, a writer model, etc.). We got some great wins from that redesign:
Stability: Each app was insulated from traffic spikes or outages affecting the other.
Scalability: We could scale the apps on separate machines that were appropriately priced and configured for their differing needs.
But, we also encountered some problems:
Our development process could get bogged down in managing our gem: To QA our shared code on a staging environment, we had to cut a release candidate version of our gem. If two developers were working on changes to the gem at the same time but on separate branches, they would both cut the same release candidate version for the gem, and one branch would clobber the other. One developer’s code wouldn’t work on staging, but there was no indication to that developer that the release candidate they were using didn’t actually contain the code they had pushed.
Our test suite wasn’t comprehensive: When we changed code in our gem, we needed to be sure those changes were safe for any dependent code in either of the two Rails apps. Each of the Rails apps was housed in a separate Git repo, which meant that none of our commit scripts ran the code for all three code bases (WWW, CMS, and the gem), even though those code bases were interdependent. We had to remember to manually run all three tests suites. Sometimes we did not remember.
We still wanted to be able to scale and deploy our apps separately, but we discovered a new requirement: We also wanted to share code between these two apps in such a way that our development process would be streamlined and our apps’ dependencies would be testable in a single suite.
We launched our Rails Engine Architecture a little over a month ago, and since then, it has given us flexible deployment of our separate apps but with a more convenient development process. The gem that was housing our shared code is now an engine that we always load, and our CMS and WWW apps are two engines that we can load together (in local development, for example) or individually (on production machines).
We drew heavily from TaskRabbit’sexcellent blog post and sample app. In fact, we followed a very similar trajectory to theirs. We especially liked their BootInquirer model, which handles loading and mounting engines based on environment variables. Like them, we also chose to keep all of our tests in the top-level spec directory.
We took the following steps to migrate our code:
Convert each of our main apps, WWW and CMS, into engines. They remained separate apps in separate repos but were namespaced and mountable.
Create a container app with sample dummy engines. Set up our Browserify configs and BootInquirer model. Tweak our loading and mounting strategies to work on Heroku dynos.
Drop the WWW and CMS engines into the container app.
Convert our shared gem into an engine in the container app.
We encountered a few particularities in our implementation that might be useful to others:
Deploys to Heroku:
If you’re deploying to Heroku, you’ll probably want to have conditional logic in your Procfile to configure your dynos differently depending on which engine or engines you are mounting.
You can keep your Procfile clean by loading external scripts like so:
1
worker:script/launch-resque-worker
And you can put your conditional logic in your script/launch-resque-worker file like so:
1234567891011121314151617
#!/bin/bashexportTERM_CHILD=1exportJOBS_PER_FORK=100if[["$ENGINE_BOOT"=="cw"]];thenexportQUEUE=c_worker,w_workerelif[["$ENGINE_BOOT"=="c"]];thenexportQUEUE=c_workerelif[["$ENGINE_BOOT"=="w"]];thenexportQUEUE=w_workerelseecho"ENGINE_BOOT=\"$ENGINE_BOOT\" is not valid!"exit1fiexecbundleexecrakeworkers
Browserify-Rails on Engines:
The Rails asset pipelines in our two main apps diverged during their 18 months apart. We introduced Browserify-Rails to our WWW app while our CMS app remained on Sprockets-CommonJS. We use the following configurations to keep Browserify’s effects local to a single engine. Inside that engine’s engine.rb file, we added the following configs:
Because we deploy to Heroku, we also had to tweak the package.json file. In fact, we have two package.jsons. Heroku’s Node.js buildpack runs npm install from the top level directory, so we have a package.json at the top level that looks like this:
The scripts fields call the relevant npm commands within the engine that is actually using Browserify-Rails. We have a second package.json in the engines/www directory that contains the engine’s dependencies.
In our next design iteration, it’s likely that we’ll extract our front-end assets from Rails entirely and let our Rails app function as an API layer.
We’re also interested in ways we can extract API services from our current apps into their own simpler engines inside our container. We look forward to sharing our future iterations with you!
In February, Upworthy announced Attention Minutes — a new standard for measuring user engagement on websites. Attention Minutes provide a more accurate and useful indicator of user experience than traditional metrics like pageviews and unique visitors.
In that announcement, we promised we’d share the details of our implementation with the public. We’ll do so here, in a series of posts on the Upworthy R&D Blog.
These posts will start with a high-level overview of what signals we take into account when determining whether a page has a user’s attention. Then, they’ll describe the JavaScript code we use to measure those signals and send them to our data systems for processing and analysis.
It’s worth mentioning that this series will only cover the method we use to record Attention Minutes in the browser. This technique is useless without additional systems to process, store, and analyze the (potentially very large) quantities of data generated by code like this. If that sounds daunting, you may want to consider utilizing a third-party analytics tool such as Chartbeat, whose “Engaged Time” is very similar to Attention Minutes. Other third-party analytics tools may also be adding attention tracking in the near future.
What do we mean by “attention”?
We consider the page to have the user’s attention if
some activity is happening on the page. For our purposes this means:
and the user has interacted with the page within a certain timeout (more on what counts as “interaction” later)
or a video is playing on the page
Attention Minutes, then, are the total number of minutes that a user has spent on a page where the above conditions have held true. Next, we’ll take a deeper look at how to test for each of these conditions.
Introduction to Bacon.js & event streams
For our implementation, we’re going to be using a JavaScript library called Bacon.js. For the unfamiliar, Bacon is an FRP (functional reactive programming)-style JavaScript library that allows us to merge, filter, and transform events without descending into event listener/callback hell.
Whereas traditional approaches involve reacting to discrete events in the context of a callback, Bacon.js lets us work with the set of all events of a given type that might occur on a given element as a single event “stream.” If event callbacks are machines waiting at the end of event-carrying conveyor belts, Bacon.js could be thought of as a tool for manipulating the conveyor belts themselves.
While this blog post assumes no previous experience with Bacon.js, it only provides a cursory overview of its functionality. For more information on the differences between reactive and event-driven programming, and when/why an FRP-style approach can be beneficial, here are some blog posts we recommend:
Now on to the actual implementation! While in our examples we are assuming that jQuery is also on the page, jQuery is not a dependency for using Bacon.js.
Listening to events and reacting to events using Bacon.js
Bacon.js adds the asEventStream method to jQuery. asEventStream returns a Bacon.js stream of all the events of a given type that occur on a given element. For example, to create an event stream that contains all of the “focus” events on the $(window) element, we could do something like this:
We can act on events that pass through a given event stream with the onValue function. onValue takes as its argument a separate function that is then called any time a value passes through the given stream. For example, if we wanted to log each event that passes through allFocusEvents, we could write:
This is analogous to .on in jQuery, but as you will see, streams provide us with much more powerful tools for working with events.
In addition to firing functions in direct response to events, we can use Bacon’s map method to transform events as they arrive, producing a new stream of events in a different format.
map takes as its argument a transformation function and returns a new stream containing the result of applying the transformation function to each event passing through the source stream. For example, if you wanted to log the y-offset every time a user stopped scrolling on the page, it could look something like this:
In addition to accepting a transformation function, map can also accept a non-function value for all incoming events to be transformed into. For example, .map(x) has the same semantics as .map(function() { return x; }.
Bacon.js also provides the notion of a “property.” A property is like a stream, except it has a “current value.” The current value of a property is, by default, the last event to pass through the stream. We can retrieve a property for any given stream by calling toProperty on the stream. toProperty optionally takes an initial value.
For example, we could use a property in conjunction with the filter and merge methods to model whether or not the enter key is currently pressed.
Now that we have some of the basics of Bacon.js under our belts, let’s turn to putting together some Bacon properties that can represent “attention” based on the conditions we outlined above.
Does the page currently have focus?
We think of the page as
1. having focus when the page loads,
2. losing focus if the window receives a blur event, and
3. regaining focus if the window receives a focus event.
If we take all “focus” events as true and all “blur” events as false, we can merge those two streams to create the new stream isFocused.
We can then use the toProperty method to capture the value of the isFocused event stream. Note that we are supplying it with a default value of true because we consider the page to have focus on page load.
We’ve tried to keep this example as succinct as possible, but it’s worth noting that one could achieve better results by utilizing the Page Visibility API. Support is somewhat limited as of this writing, but if you’re interested in going that route, Mozilla has published an excellent tutorial.
Has the user interacted with the page recently?
Let’s now implement a property, recentlyActive, that represents whether the user has engaged with the page within a certain timeout. For the purposes of this post, that means the events focus, click, scroll, mousemove, touchstart, touchend, touchcancel, touchleave, and touchmove.
Let’s first build a stream that contains all of these events. For that, we’ll need to utilize Bacon.mergeAll. mergeAll takes its arguments and merges them together into a stream containing all the elements from each:
Using this stream we now want to build a property that represents whether or not an event has passed through signsOfLife within a certain timeout. For that, we’re going to need three more utility functions from Bacon.js: delay, once, and flatMapLatest.
stream.delay(ms) creates a new stream that contains all the elements of the original stream, only delayed by ms milliseconds.
Bacon.once(x) creates a new stream that emits x once and then ends.
To achieve the timeout behavior we want, let’s first write a function that creates a stream that will emit true, then after a certain timeout, emit false. We’ll call it decayingStream:
To put this all together, we’re going to need one more utility function, flatMapLatest. For each element in the source stream, stream.flatMapLatest(f) creates a new stream using f (which must be a function and always returns a stream of its own). The stream returned by flatMapLatest, then, emits any value emitted by the most recent stream generated by the function f.
Returning to our conveyor belt metaphor, you can think of flatMapLatest as transforming incoming values into their own conveyor belts using f. As each new conveyor belt is created, it pushes out the previous one and begins sending its own values down to the next part of the factory.
This probably seems a bit abstract, so let’s look at an example. Here’s what it would look like to use flatMapLatest to figure out if a user has been recently active:
As each user-generated interaction event passes through the stream signsOfLife, a new decaying stream is generated. Think of this decaying stream as providing a timeout, which we set earlier to 5000 ms.
The decaying stream flips recentlyActive to true, and then, given enough time, back to false. If another “sign of life” occurs within the timeout, however, the original decaying stream will be replaced with a new one that has a fresh timeout, and the recentlyActive property will remain true for at least another 5000 ms.
Does the page have the user’s attention?
Assume for a moment that we have a property representing whether a video is playing on the page. Let’s call that videoIsPlaying. We could implement a property, hasAttention that represents whether the user is currently active (or what we call paying attention) that would look something like this:
In future posts, we’ll describe the implementation of videoIsPlaying, as well as how to use the hasAttention property to actually track Attention Minutes. For a sneak preview, here’s a simplified code sample that demonstrates the technique.
This is a writeup of a talk I presented with Ryan Resella at RailsConf 2014.
When Upworthy launched in early 2012, we knew that if we executed well, we’d get popular quickly. Our mission, after all, is to drive massive amounts of attention to the topics that matter most. Being a website, that means lots and lots of web traffic. So from the very beginning Upworthy was engineered to handle viral traffic.
Buongiorno, Padrino
The early engineering team at Upworthy was composed of just two full-time staff: me as Founding Engineer and Tim Jones as CTO. We had very limited resources to build something from scratch, so we needed to choose a framework that emphasized developer productivity. I was a seasoned Ruby on Rails developer but at the time was souring on it. I felt that Rails was bloated and enforced opinions that I didn’t necessarily agree with. But I still loved writing Ruby code, and Sinatra’s low-level take on a web framework was very appealing to me.
I found Padrino as a happy middle ground between Rails and Sinatra. Padrino is essentially Sinatra with a little bit of Rails sprinkled in. It also took some really good ideas from the Python framework Django:
First-class mountable apps. Unlike Rails engines, all Padrino projects must be made out of one or more mounted apps.
Built-in admin area as a mountable app. While Rails Admin is great, the framework-level support for an admin area was a strong benefit.
Middleware-centric. Padrino puts emphasis on a web app being a stack of middleware layers, which is a powerful concept for experienced web developers.
Experienced web developers, particularly those who’ve used the popular frameworks out there, eventually come to a realization: Frameworks fundamentally exist to help us respond to requests for HTML, CSS, JSON, JavaScript, and other resources. And so lower-level concepts like Rack and WSGI become very appealing, as do microframeworks built on top of them like Sinatra and Flask.
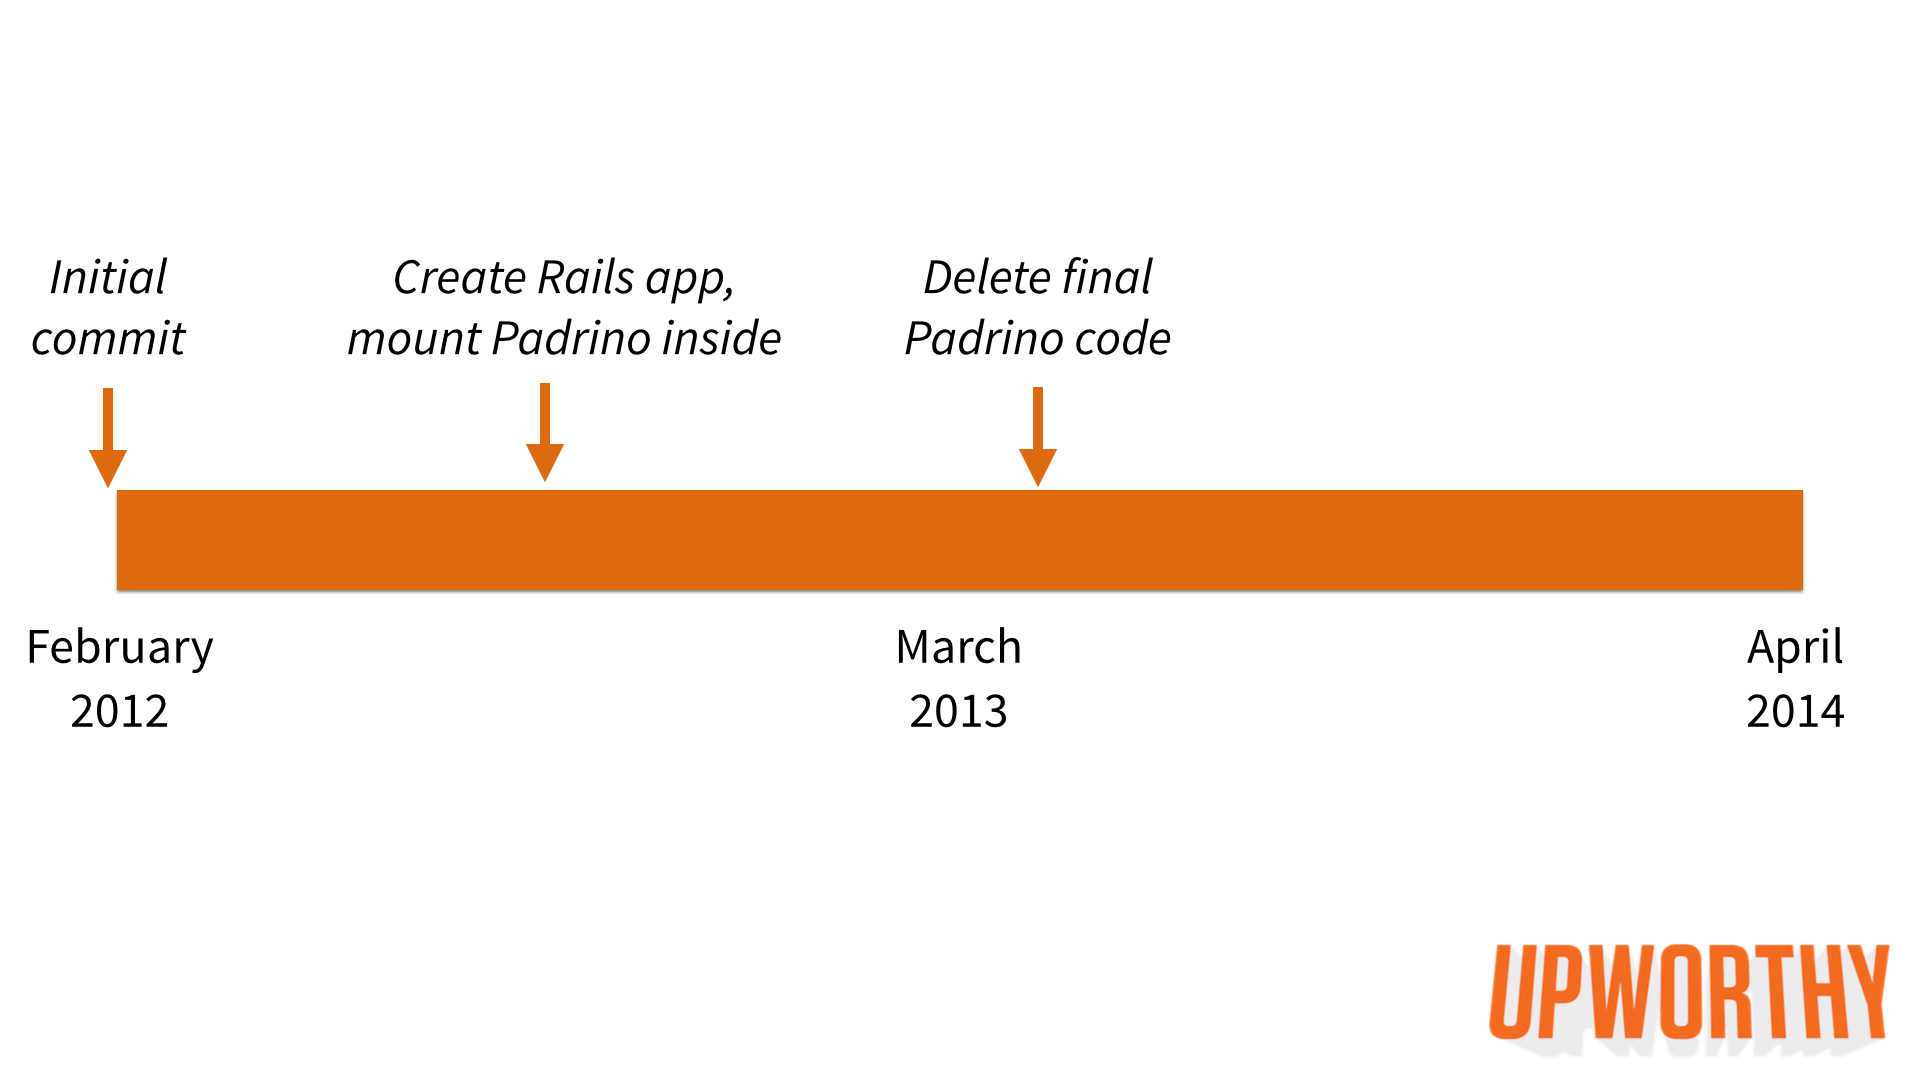
For launch on March 26, 2012, Upworthy was built on top of Padrino and deployed on Heroku. It was light and performant. It embraced Rack and Ruby. There was little magic. And it was unopinionated, letting us decide the exact libraries we wanted to use to accomplish our development goals.
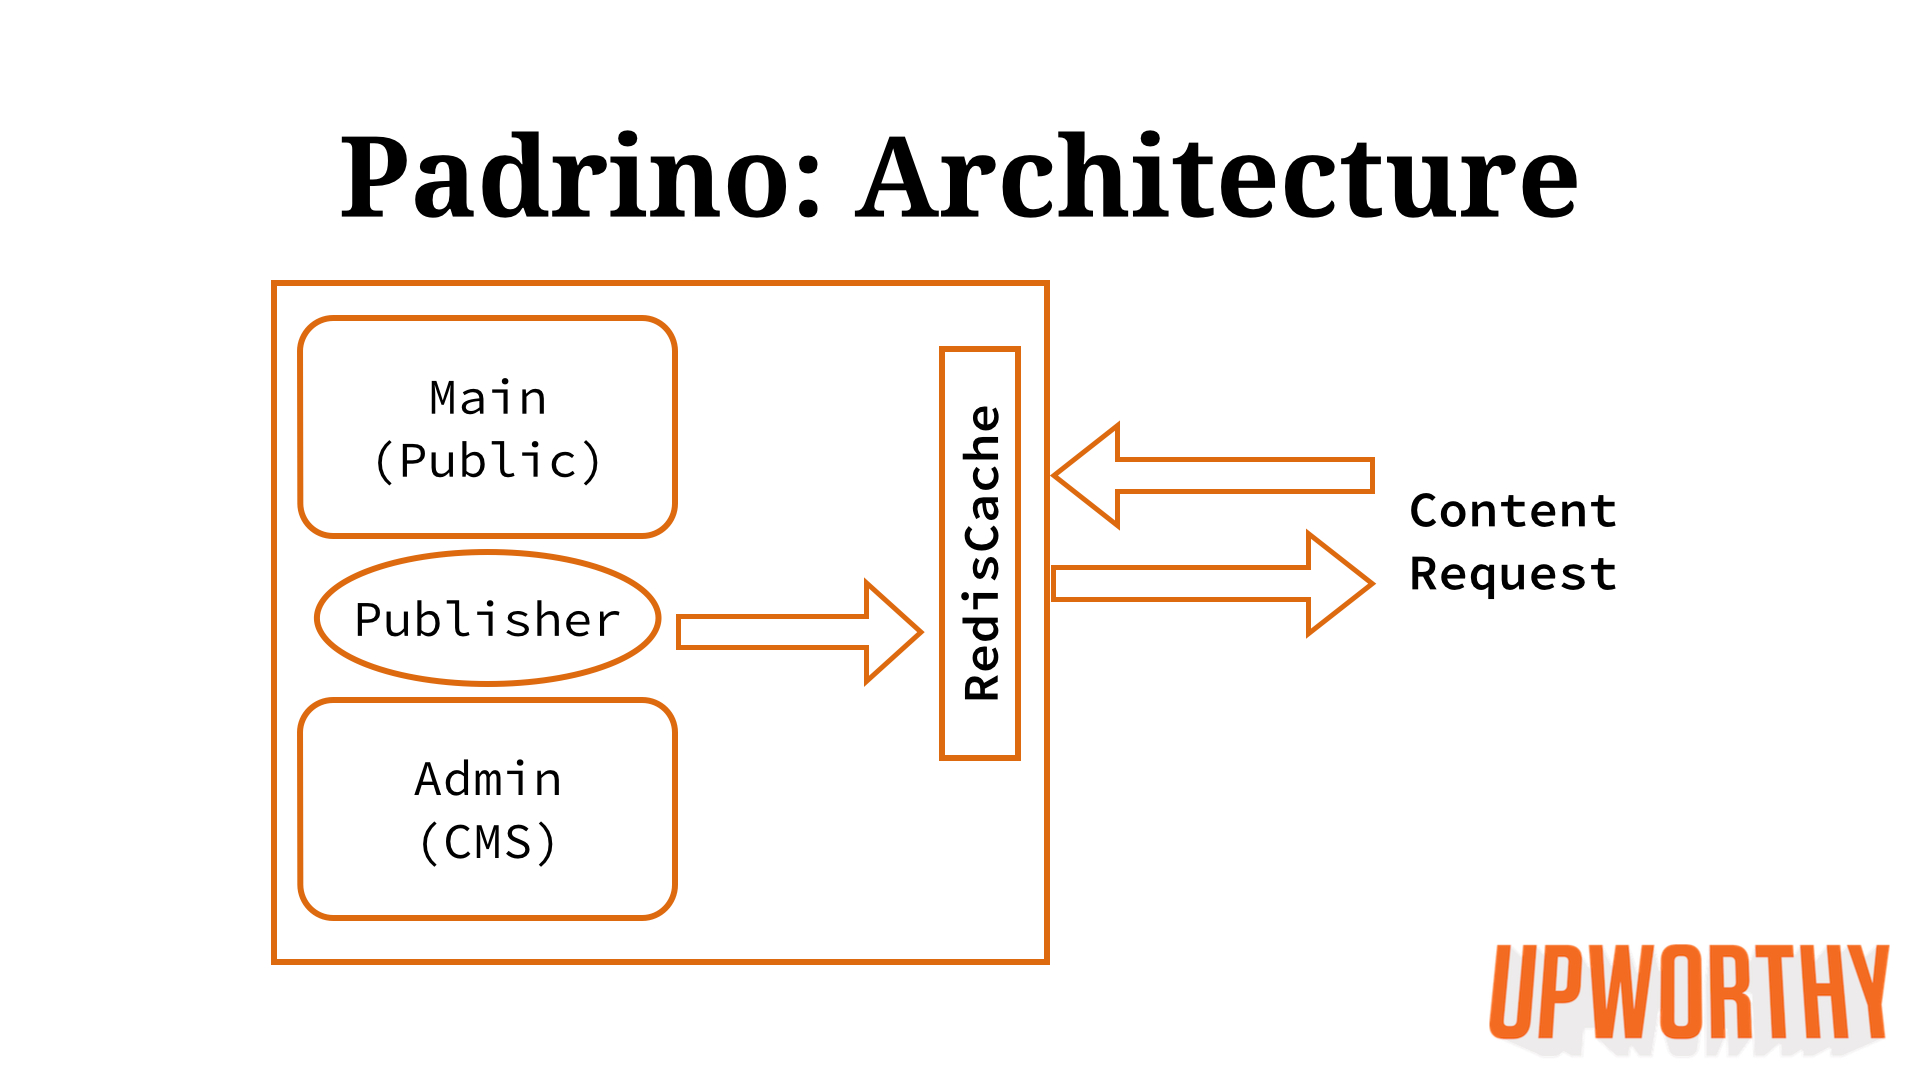
Our Padrino project was composed of two mounted apps and a middleware layer for caching the public content pages:
The middleware layer, called RedisCache, combined with the Publisher object created a system I dubbed “explicit caching.” It was inspired by the way Movable Type, the popular blogging engine of the 2000s, was architected: A writer would save their post to the database, and upon any database update, the system would re-render the necessary HTML to the filesystem. This resulted in a website that was extremely scalable using very limited resources because public traffic for a blog post hit the fast filesystem and didn’t make any database calls.
For our Padrino project, we built a Publisher object inside the Admin app. When curators updated the posts, the Publisher would make an HTTP call to the Public app (we actually used Capybara to simulate a real request) and saved the rendered HTML to the RedisCache. The RedisCache was a middleware layer that sat near the very front of our stack and quickly served our HTML pages to the public.
This worked well for us in the early months despite being an admittedly bespoke approach to solving the scaling problem. In June 2012, we hired a second Ruby/Rails engineer, Josh French. Within a few weeks of starting, he shared with us an important observation: “We should move to Rails.”
Moving To Rails
Josh was right. While the technical performance of Padrino was more than sufficient, we were bogged down by other factors. The ecosystem for libraries was good, particularly thanks to the popularity of Sinatra and Rack, but it wasn’t as great as Rails. The libraries that we were depending on, as well as the Padrino framework itself, were infrequently maintained when compared to their Rails counterparts. And as a growing startup, we needed to be able to recruit more engineers. Very few had heard of Padrino. The Rails community itself is an enormous asset, and something we missed.
In October 2012, Josh started the migration. We hired a third Rails engineer (Ryan Resella) in January 2013. Between off-and-on work by Josh and Ryan, it eventually took eight months to finally delete all Padrino code from our codebase.
Why so long? We had other things to do! We needed to balance the demands of a growing company that was experiencing massively growing traffic. But thanks to the fact that Rails, Sinatra, and Padrino are all just built on top of Rack, we were able to live comfortably with a hybrid app for many months.
The steps we took to migrate were:
Generate a new Rails app. Stick Padrino app in lib/upworthy & mount it in routes.rb.
Migrate models, utilities, and Rake tasks to Rails.
Migrate assets from Jammit to the Rails Asset Pipeline.
Migrate front-end views and controllers to Rails.
Migrate CMS views to Bootstrap and CMS controllers to Rails.
Scaling Rails
For most of 2013, we were doing things The Rails Way. Our productivity noticeably increased. We were now a Rails monolith, jokingly referred to as a Monorail. All of our concerns were contained in a single Rails app: the front-end public site, the dynamic AJAX endpoints we use there, and the back-end CMS our curators use.
Doing things The Rails Way meant caching The Rails Way. We employed action caching for our content pages, backed by a memcached store. We served assets out of AWS S3 and Cloudfront. This worked mostly well for us, though we found ourselves routinely scaling our Heroku dynos during traffic spikes since the Rails app was directly serving our HTML.
In the fall of 2013, we decided to move our public HTML to a CDN, selecting Fastly. After we completed the move, all of our public assets (HTML, CSS, JS, images, and even some JSON) were being served out of Fastly’s global CDN. This was a huge win for us. Our site’s mobile load time improved significantly. We were able to turn off Rails action caching and instead manually set Fastly-optimized cache headers from our Rails controllers. We were able to dial down our Heroku dyno usage, though a CDN costs money too, so our overall hosting costs have increased. Most importantly, our public site hasn’t experienced any significant downtime since we moved to Fastly.
Moving To A Service-Oriented Architecture
There were downsides to a Monorail. Multiple concerns are stuck together within a single app. The codebase had expanded and god objects started to appear. Our team had grown to four Rails engineers, so we’d tend to trip over each other while building new features and fixing bugs. And while we haven’t experienced downtime on the public site, our public AJAX endpoints would become strained during traffic spikes, which would cause significant instability on our back-end CMS.
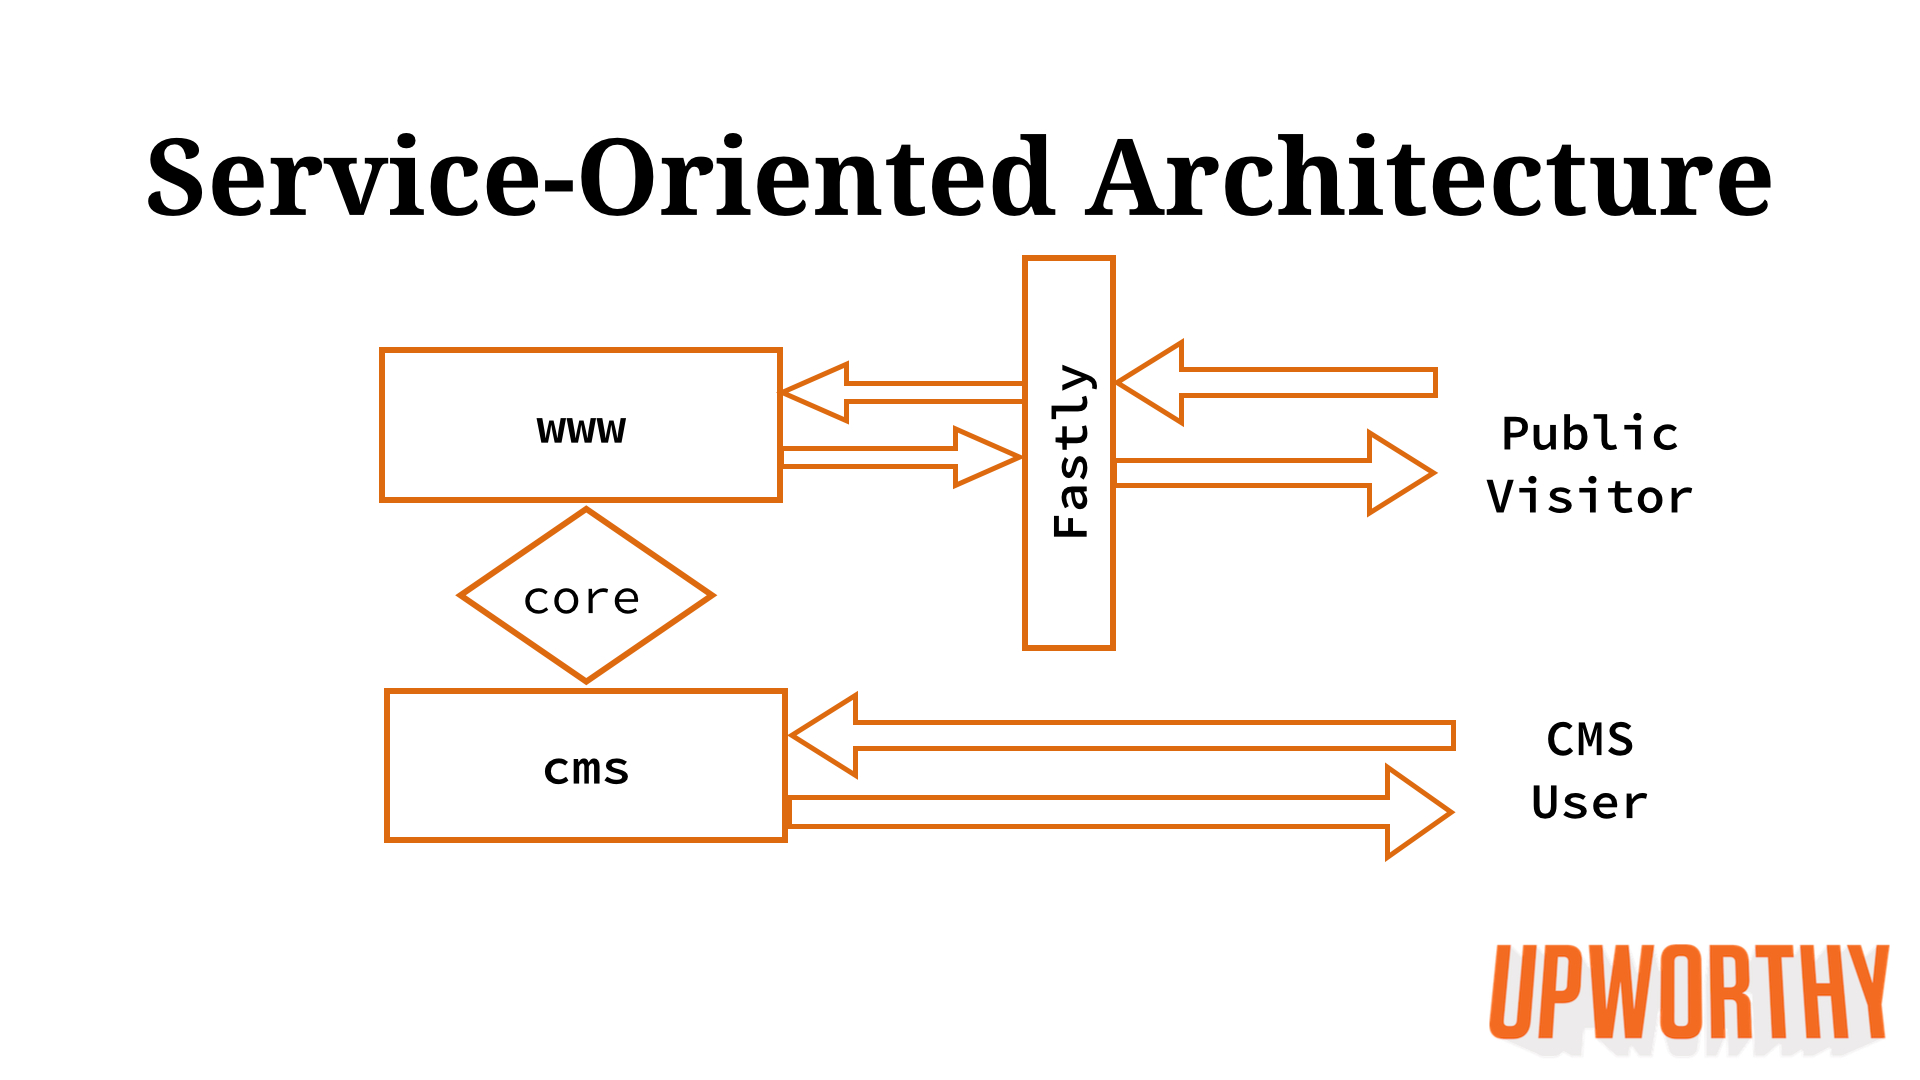
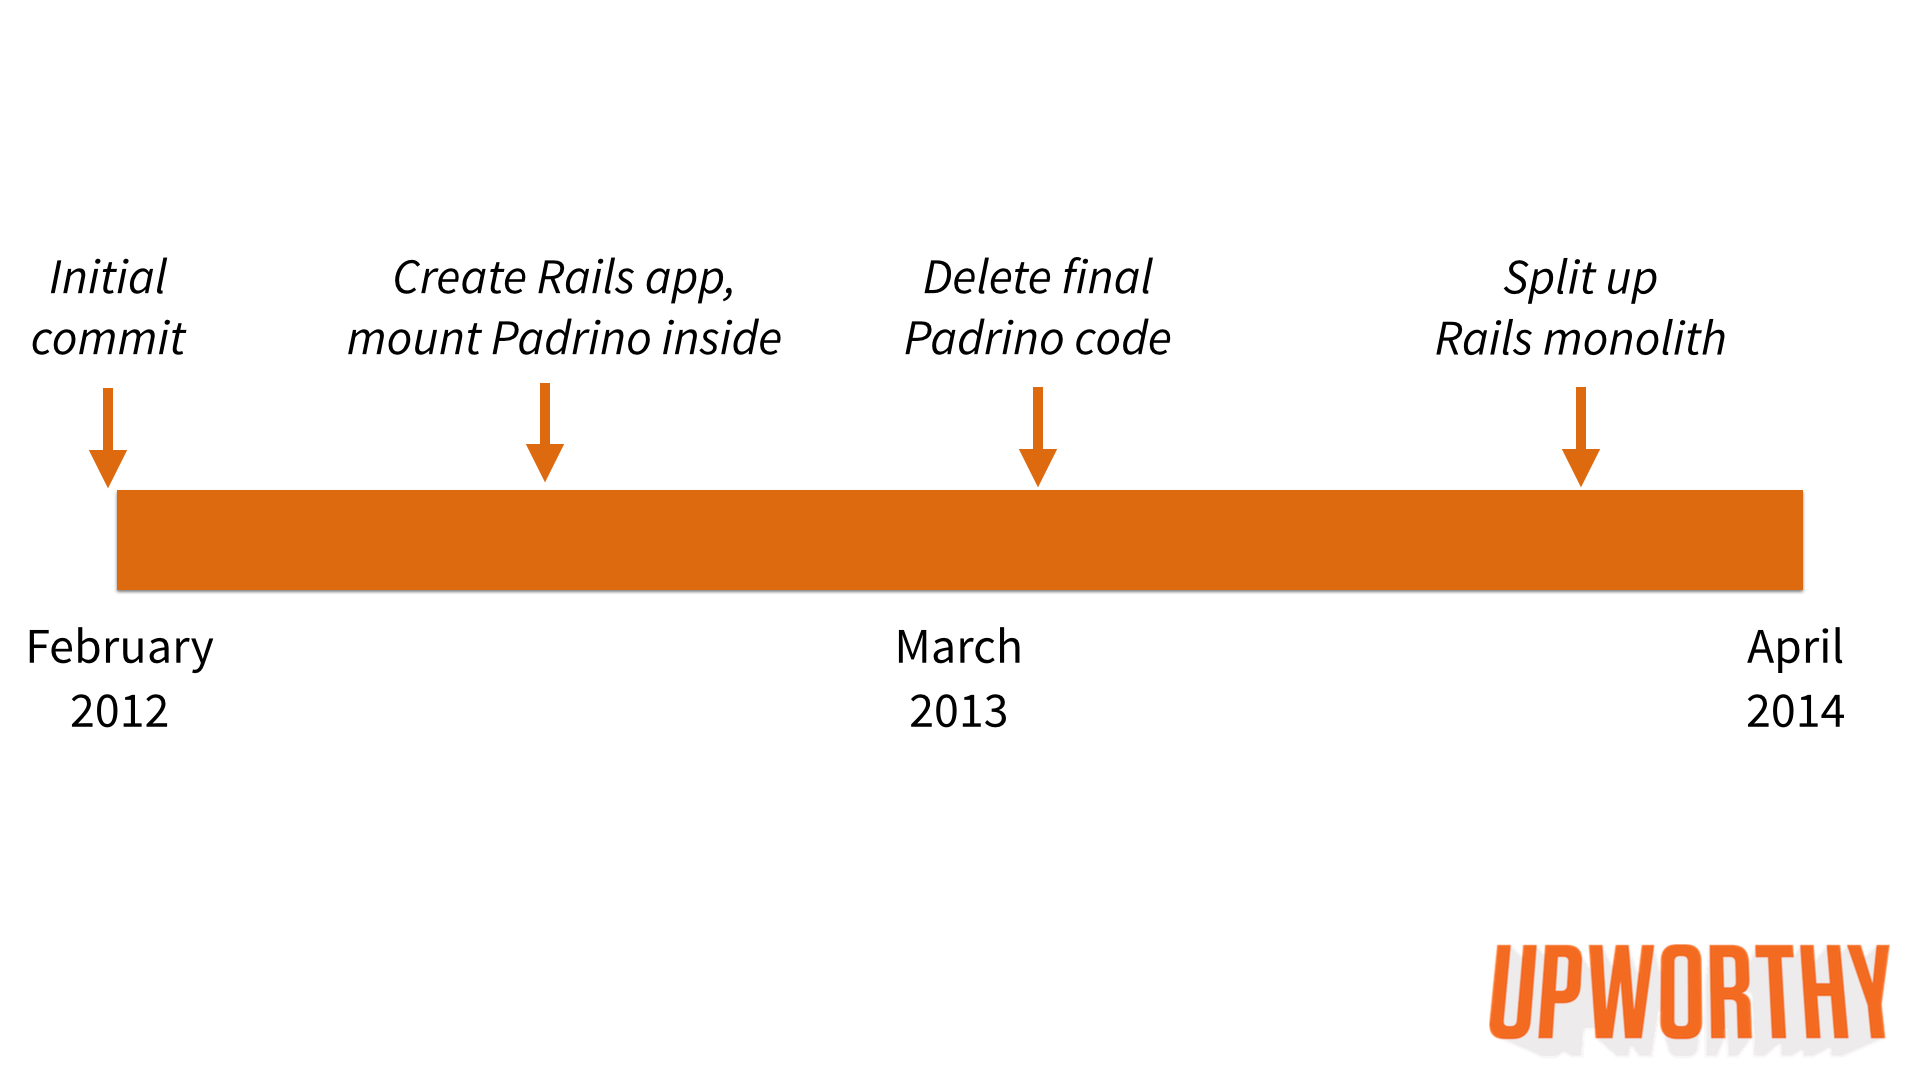
So we decided to split up our codebase into a service-oriented architecture. Josh performed the surgery in a few weeks, starting in December 2013 and finishing the next month:
Decide how many services to split into. We chose to create two new Rails apps: www (the front end) and cms (the back end).
Clone the Monorail into two separate git repos to maintain history. Each repo was now a new Rails app.
Split up controllers, views, assets, and concerns among the two apps.
Deploy each app as a distinct Heroku app.
Switch Fastly to point at the new www app. This resulted in zero downtime.
De-duplicate code between the two apps, creating a core gem (mostly models) to keep code DRY.
Here’s what our architecture looks like today:
We can now properly scale the two apps: just a few Heroku dynos for cms and a bit more for the front-end www app serving our content and dynamic AJAX endpoints. Our cms no longer experiences instability when we have traffic spikes. Engineers don’t step on each other’s toes.
There have been some noticeable drawbacks. It has increased the complexity of our development setup. We have to coordinate deploys a bit better between the two Rails apps and the core Ruby gem. Migrating to a fully DRY setup is tedious, ongoing work.
Over the next few months, we’ll continue to consider breaking up the apps even more. In particular, www seems like a good candidate to split into a static site generator and a RESTful AJAX API. The apps currently communicate by sharing databases. We may want to write a more abstract data layer.
Looking back at the last two years, here’s how these big migrations have gone:
Notice how evenly spaced the changes have been. We’ll likely not complete our move to a service-oriented architecture until the end of summer 2014. This is completely acceptable for us. This is the reality that the engineering team at a fast-growing startup faces. We’re building a business, and we have more internal and external features on our to-do list than we can realistically ever get to.
At Upworthy, we strive to make data-driven decisions whenever possible. So when we started to get serious about capturing and storing our own data, we set out some attributes that our ideal system would have. We wanted our warehouse to be:
Understandable so that anyone in the company — not just analysts — could query it.
Scalable so that it could handle clickstream data for tens or hundreds of millions of monthly visits.
Flexible so that power users (like analysts) could explore the data in ad hoc ways.
Oh, and it couldn’t cost a fortune. And since we were starting with only one full-time engineer on the project, it needed to be something that was pretty low-maintenance to maintain.
We figured we wouldn’t meet all of these criteria, but they set a good goal to shoot for.
As a first step, we wanted Upworthy’s staff to be able to answer ad-hoc questions about our basic object data. But when we initially built and launched Upworthy.com in March 2012, we’d decided to back it with a Mongo database. MongoDB is resolutely non-relational — meaning that it doesn’t allow JOINs across collections (Mongo’s version of tables).
So even a relatively simple question like “How many posts about gender diversity did our freelancers curate in April?” isn’t easily answerable, because it would require joining post data with topic data with curator data. The flexibility that MongoDB gave us in evolving our content management system was great, but for those of us on the analytics side trying to respond to data-hungry colleagues, it quickly became a hindrance.
One option was to migrate our site to a traditional RDBMS. But the prospect of rejiggering our whole site just for analytics seemed impractical. Luckily, before we headed down that path, we heard that the nice folks at Stripe had just open-sourced a new tool called MoSQL. It tails MongoDB’s log of operations, and keeps a PostgreSQL slave in sync with the MongoDB master.
To be honest, it sounded both too good to be true, and kind of crazy. But we didn’t have anything to lose, and it was really simple to set up — you just map your Mongo collections to tables in PostgreSQL using a simple YAML file, like this.
123456
accounts:
    :columns:
        - _id: TEXT
        - created_at: TIMESTAMP
        - first_name: TEXT
        - last_name: TEXT
So we gave it a try and … it worked. Not only did it work, but it has continued working, stably and reliably, for almost a year now. So that solved our first problem: Our object data was now in an RDBMS.
But our object data is a relatively small dataset — and we were skeptical about whether a traditional RDBMS could manage the larger volume of data we knew we ultimately would want to process. Because really, we knew we’d want to ask questions about events, not just objects. Questions like, “How many Attention Minutes did posts about economics garner in April?” And this would require a more complicated system.
So we started adding Javascript trackers to observe all the client-side events we cared about, and report them to our servers. The problem was, once we had the events recorded, we needed somewhere to put them. And while our PostgreSQL database could handle data for a few thousand posts and a few dozen curators, it wasn’t going to gracefully handle querying tens of millions of daily events without some serious tuning. Even then, many of the queries we’d want to run would be pushing the limits of what PostgreSQL could do without having to wait hours or days for results.
A few of our engineers had experience using Vertica, a popular data warehousing solution. But particularly with only one dedicated engineer and a limited budget, that seemed like overkill for what we needed. Luckily, AWS had just introduced their columnar data warehousing solution, Redshift, and several friends suggested we give it a shot.
So we spun up a small cluster (yay for paying by the hour!) and tried it out. And we were very impressed.
From the analysts’ perspective, Redshift was just a slightly modified version of PostgreSQL. Except it was blazingly fast, even when running complex queries with several Common Table Expressions and a bunch of JOINs on many millions of rows. And from the engineers’ perspective, Redshift was great because maintenance was handled by AWS, it was easily scalable WAY beyond where we’re at now, and reserved instances brought our cost per TB down to about $2,000/year.
So at that point, we had a data warehouse that could easily handle all our data, didn’t cost a fortune, required very little maintenance, and could tolerate as much ad hoc querying as the analysts’ hearts desired. Not too shabby.
The only thing left on our wish list was a way for people who don’t speak SQL to explore the data.
One of our investors had mentioned Looker, a business intelligence startup, and when we talked to their team, we were really impressed. They didn’t tell us our schema had to fit their one-size-fits-all specifications, and they were happy to let us explore all of our data without charging us extra. In fact, they set up an instance for us in just a few minutes and let us start querying our data immediately.
Because Looker’s data explorer is a point-and-click web application, the rest of our team can use it as easily as the analysts — no SQL experience required. And because it exposes the SQL it’s running on our data warehouse, our analysts quickly figured out how to get the most out of the tool.
So, to our surprise, we had a system that met all of our goals. And all thanks to a bunch of tools that were less than a year old. But there’s one more thing…. (sorry, couldn’t resist).
This gave us a data warehouse that had a 24-hour ETL cycle. That was pretty good, but we were eager to find ways to get that ETL cycle shorter. We had looked at powerful stream processors like Flume and Kafka. But again, small team, limited resources.
At the end of 2013, almost as if they’d been listening to our internal deliberations, AWS rolled out Kinesis. Kinesis provided the stream processing functionality we needed, without the dev/ops overhead that comes with standing up your own stream processor. (AWS’s slogan really should be, “We give you all the functionality of [cool thing x] without the hassle of having to build [cool thing x] yourself.”)
This week, after a few months’ work by our now-2.5-person analytics engineering team, we’re rolling out our “fast data pipeline.” Instead of up to 24 hours of latency, our new pipeline is more like 3-5 minutes behind. So yeah: MoSQL, Redshift, Looker, Kinesis. Give ‘em a look. And give us a shout if you have questions.
Upworthy is now two years old. Those of us on the engineering team figured it was high time to start sharing what we’ve built and lessons we’ve learned with the rest of the world.
So in the coming months, we’ll put on our bloggin’ caps and start pushing to this GitHub Pages site like it was going out of style.
Some things to look forward to:
Announcements of open-source libraries we’re releasing.
How we’ve scaled for Upworthy’s explosive growth.
Our technology stack and how it’s evolved to meet our needs.
How we continuously try to crack the code that is online virality.
Cool? Cool. Keep in touch by subscribing to our feed and following us on @UpworthyRD.
 R&D
R&D Dependence on a shared gem: one of the downsides of a multi-app architecture.
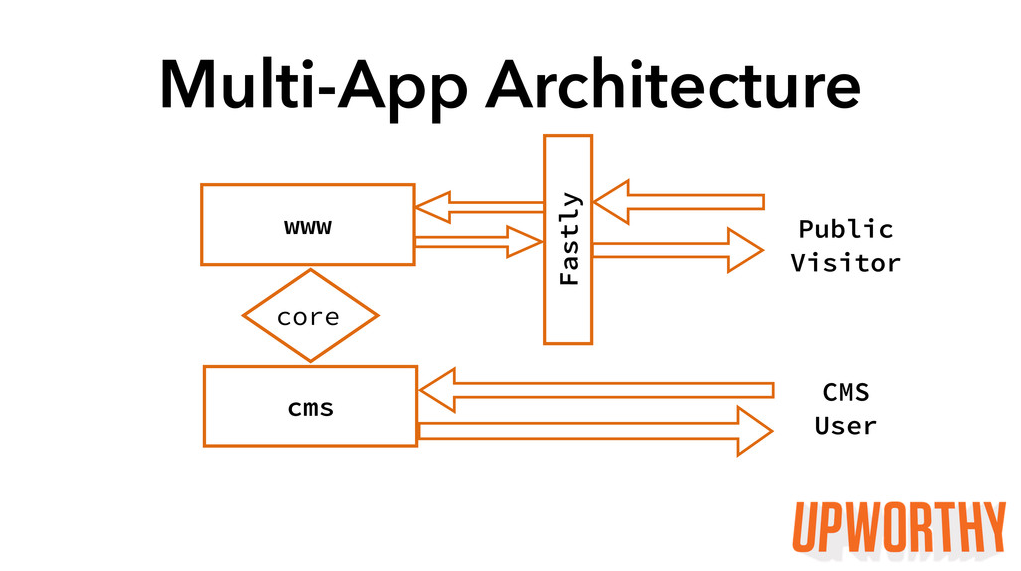 But, we also encountered some problems:
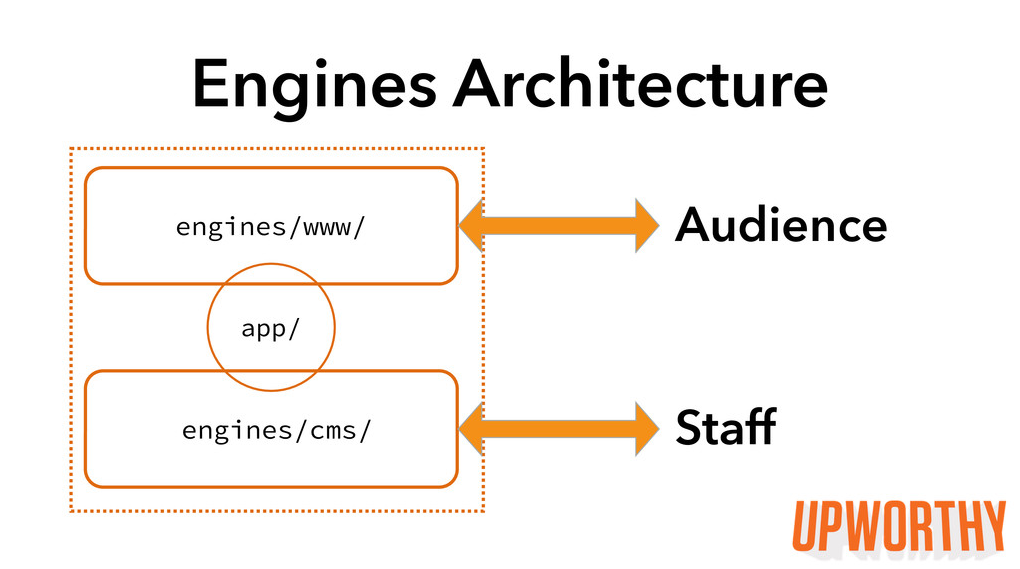 We drew heavily from TaskRabbit’s excellent blog post and sample app. In fact, we followed a very similar trajectory to theirs. We especially liked their BootInquirer model, which handles loading and mounting engines based on environment variables. Like them, we also chose to keep all of our tests in the top-level spec directory.